1. 概述
Spring Cloud Stream 是用于构建消息驱动的微服务应用程序的框架,
简单来说,Spring Cloud Stream 是一个统一的消息编程模型,屏蔽底层消息中间件的差异,降低切换成本。
目前 Spring Cloud Stream 已经支持以下消息中间件:
RabbitMQ
Apache Kafka
Kafka Streams
Amazon Kinesis
Google PubSub (partner maintained)
Solace PubSub+ (partner maintained)
Azure Event Hubs (partner maintained)
Azure Service Bus (partner maintained)
AWS SQS (partner maintained)
AWS SNS (partner maintained)
Apache RocketMQ (partner maintained)
2. 设计思想
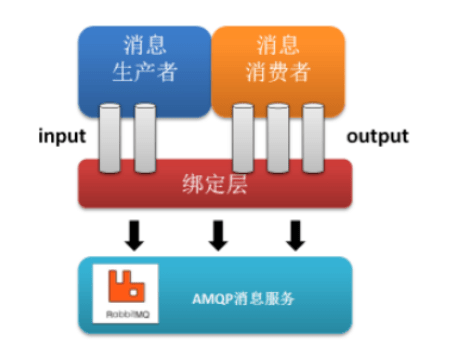
一般地,我们使用消息队列时,有如下结构:
生产者由特定的通道向消息队列发送消息,消费者通过订阅从消息队列获取消息,这个过程中应用程序需要直接与消息队列进行交互,而碍于不同消息队列构建初衷和实现上的不同,在不同消息队列之间切换会产生极大的开销。
Spring Cloud Stream 引入 Binder 作为中间层,将应用程序与消息队列隔离,通过对消息中间件的进一步封装,可以做到代码层面对中间件的无感知,甚至于动态的切换中间件,使得微服务开发的高度解耦,服务可以关注更多自己的业务流程。
详细信息可参考官方文档:Spring Cloud Stream
3. 配置
Spring Cloud Stream 有如下三个核心概念
Binder 集成外部消息系统组件Binding 绑定消息通道Message 消息数据结构
以 Spring Cloud Stream 整合 Kafka 为例,首先需要引入如下依赖:
 1
 2
 3
 4
 5
 6
 7
 8
 9
10
11
<dependency>
<groupId> org.springframework.cloud</groupId>
<artifactId> spring-cloud-starter-stream-kafka</artifactId>
<version> ${spring-cloud-stream.version}</version>
</dependency>
<dependency>
<groupId> org.springframework.cloud</groupId>
<artifactId> spring-cloud-stream-binder-kafka</artifactId>
<version> ${spring-cloud-stream.version}</version>
</dependency>
接下来是配置文件,配置可以简单的分为Binders和 Bindings两个部分,与上文核心概念对应,其中 Binder 用于接入和配置不同的中间件,Binding 用于声明统一的消息通道,下面分而述之:
Binders
一份典型的配置样例如下,两个binder分别配置了 kafka 和 rabbitMQ ,其中 environment 下面的结构和spring-kafka 和 spring-rabbitmq 配置结构相同。
💡 由于environment类型为Map<String, Object>,在idea中此部分不会有补全提示,并且可能会飘红,此为正常情况
 1
 2
 3
 4
 5
 6
 7
 8
 9
10
11
12
13
14
15
16
17
18
19
spring :
cloud :
stream :
binders :
kafka-binder : # 表示定义的名称,用于于binding整合
type : kafka
environment :
spring :
kafka :
bootstrap-servers :
- localhost:9092
rabbit-binder : # 表示定义的名称,用于于binding整合
type : rabbit # 消息组件类型
environment : # 设置rabbitmq的相关的环境配置
spring :
rabbitmq :
host : localhost
port : 5672
...
对于Binders ,还可通过以下方式配置,其示例如下:
 1
 2
 3
 4
 5
 6
 7
 8
 9
10
spring :
cloud :
stream :
kafka :
binder :
brokers :
- localhost:9092
rabbit :
binder :
admin-addresses : localhost:15672
Bindings
同样的,一份典型配置如下:
其中 consumer-in-0 和producer-out-0 是 binding的名字,可以简单的理解为通道名称,其后缀in-0和out-0 分别表示了消费者和生产者,用于函数绑定,可参考:官方文档 对此的解释。
 1
 2
 3
 4
 5
 6
 7
 8
 9
10
11
12
13
14
15
spring :
cloud :
stream :
bindings :
consumer-in-0 : #消费者
destination : stream-test-topic #topic
group : batch-in #消费者组
binder : kafka #与 binder 名称相对应
content-type : text/plain
consumer :
batch-mode : true #批量消费
producer-out-0 : #生产者
binder : kafka
destination : stream-test-topic
content-type : text/plain
4. 简单示例
经过前面的配置步骤,经过整合,我们大概有如下配置文件:
 1
 2
 3
 4
 5
 6
 7
 8
 9
10
11
12
13
14
15
16
17
18
19
20
21
22
23
spring :
application :
name : kafka-stream-test
cloud :
function :
definition : consumer;producer
stream :
kafka :
binder :
brokers :
- localhost:9092
bindings :
consumer-in-0 :
destination : stream-test-topic
group : batch-in
binder : kafka
content-type : text/plain
consumer :
batch-mode : true
producer-out-0 :
binder : kafka
destination : stream-test-topic
content-type : text/plain
此配置中,连接位于localhost:9092 的kafka,并且设定了 一个消费者和一个生产者,同时操作名为stream-test-topic 的topic。数据类型设置为text/plain ,消费者还启用了批量消费:batch-mode 。接下来开始代码部分:
 1
 2
 3
 4
 5
 6
 7
 8
 9
10
11
12
13
14
15
16
17
18
19
20
21
22
23
24
@Slf4j
@SpringBootApplication
public class KafkaStreamTestApplication {
public static void main ( String [] args ) {
SpringApplication . run ( KafkaStreamTestApplication . class , args );
}
@Bean
public Consumer < Object > consumer () {
return message -> {
log . info ( "消费者收到消息: {}" , JSONUtil . toJsonStr ( message ));
};
}
@Bean
public Supplier < String > producer () {
return () -> {
String msg = UUID . randomUUID (). toString ();
log . info ( "生产者生产消息: {}" , msg );
return msg ;
};
}
}
以上即是一个完整的消费/生产示例,启动项目之后将产生类似日志输出:
1
2
3
4
5
6
7
8
... KafkaStreamTestApplication : 消费者收到消息 : [ "c51aeab8-0244-4026-831b-f5781f1fc3ff" ]
... KafkaStreamTestApplication : 生产者生产消息 : 33499 bde - d7bf - 4027 - 9 c3b - 8d c411b10c92
... KafkaStreamTestApplication : 消费者收到消息 : [ "33499bde-d7bf-4027-9c3b-8dc411b10c92" ]
... KafkaStreamTestApplication : 生产者生产消息 : b404be47 - c607 - 4968 - 8d 6 c - fe73e427e855
... KafkaStreamTestApplication : 消费者收到消息 : [ "b404be47-c607-4968-8d6c-fe73e427e855" ]
... KafkaStreamTestApplication : 生产者生产消息 : 4636 bf09 - b9b7 - 41 ae - a0f8 - a8ec8abaf8b8
... KafkaStreamTestApplication : 消费者收到消息 : [ "4636bf09-b9b7-41ae-a0f8-a8ec8abaf8b8" ]
...
不难发现,生产者和消费者通过名称和binding 进行关联从而实现关联。
此外我们还可以通过注入StreamBridge 手动生产消息,示例如下:
1
2
3
4
5
6
@Autowired
private StreamBridge streamBridge ;
public boolean send ( String msg ) {
return streamBridge . send ( "producer-out-0" , msg );
}